# Hello, Android Deep Dive In the [Hello, Android Quickstart](http://developer.xamarin.com/guides/android/getting_started/hello,android_multiscreen/hello,android_multiscreen_quickstart/), we built and ran our first Xamarin.Android application. Now it’s time to develop a deeper understanding of how Android applications work so we can build more sophisticated programs. In this guide we review the steps that we took in the Hello, Android walkthrough so that we can understand what we did, and begin to develop a fundamental understanding of Android application development. We will touch upon the following topics: This guide helps you develop the skills and knowledge required to build a single-screen Android application. After working through it, you should have an understanding of the different parts of a Xamarin.Android application and how they fit together.

Introduction to Xamarin Studio

Xamarin Studio is a free, open-source IDE similar to Visual Studio. It features a fully integrated visual designer, a text editor complete with refactoring tools, an assembly browser, source code integration, and more. In this guide we'll learn to use some basic Xamarin Studio features, but if you're new to Xamarin Studio you will want to check out a more in-depth Introduction to Xamarin Studio.

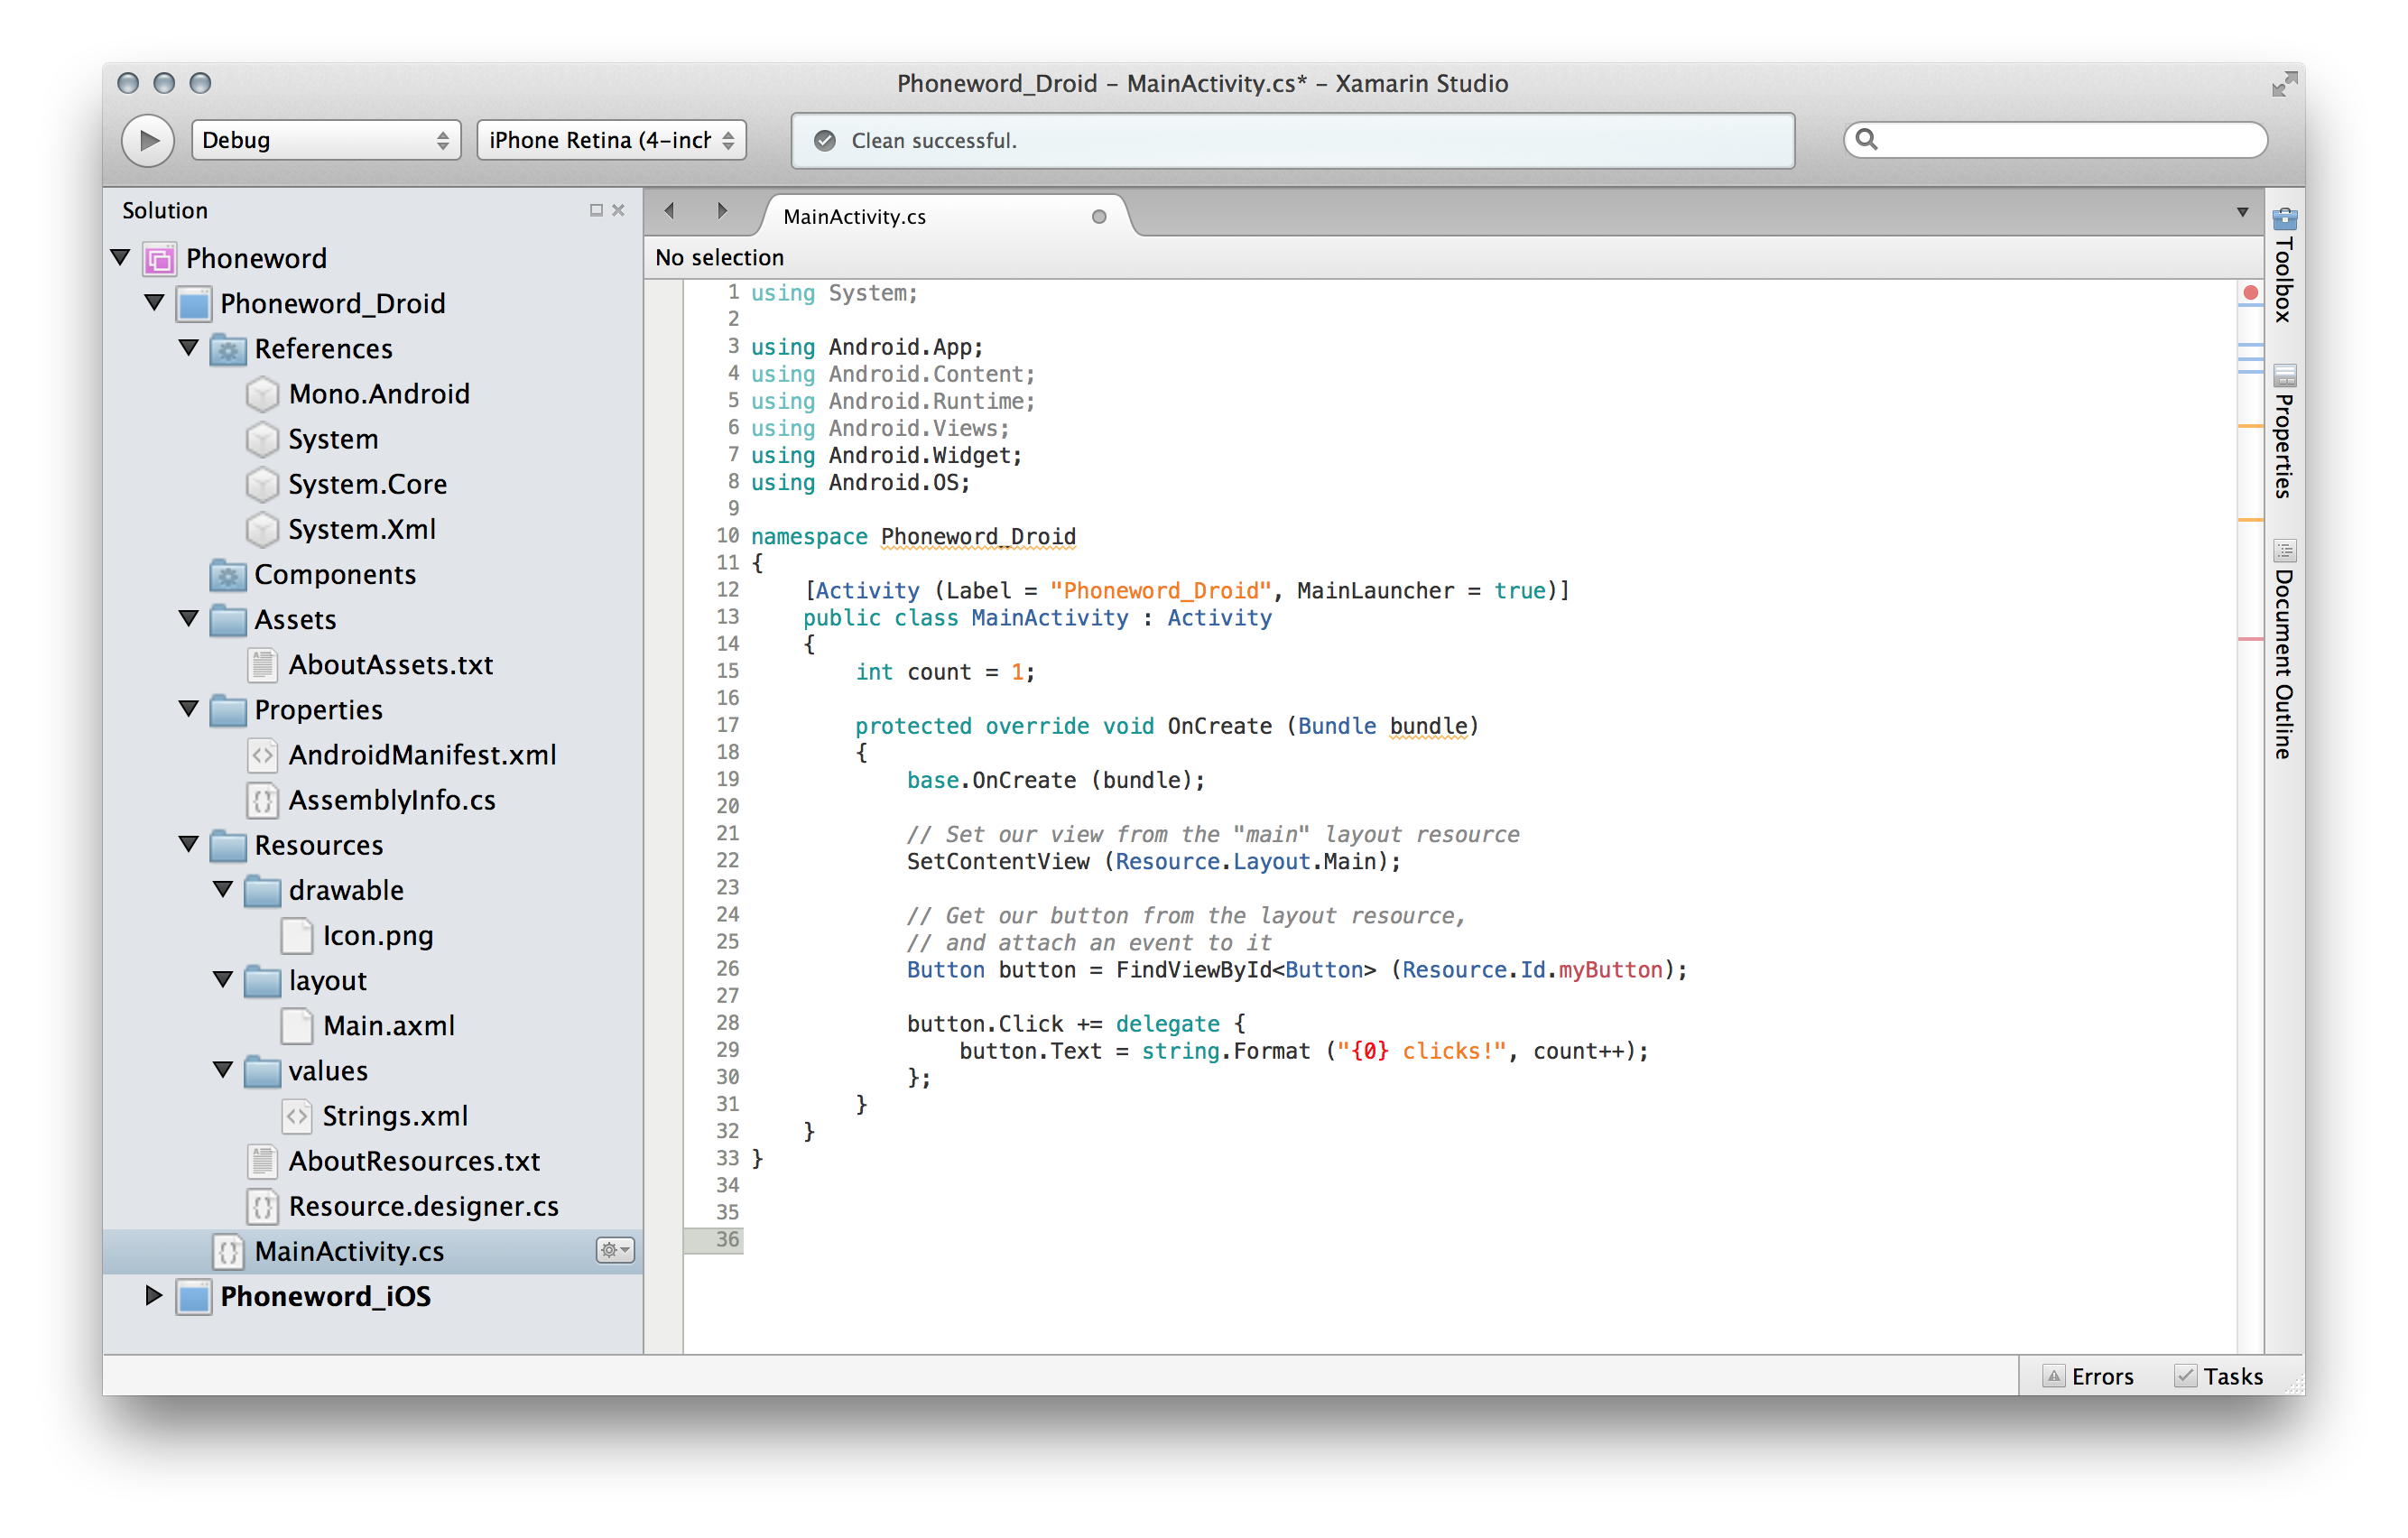
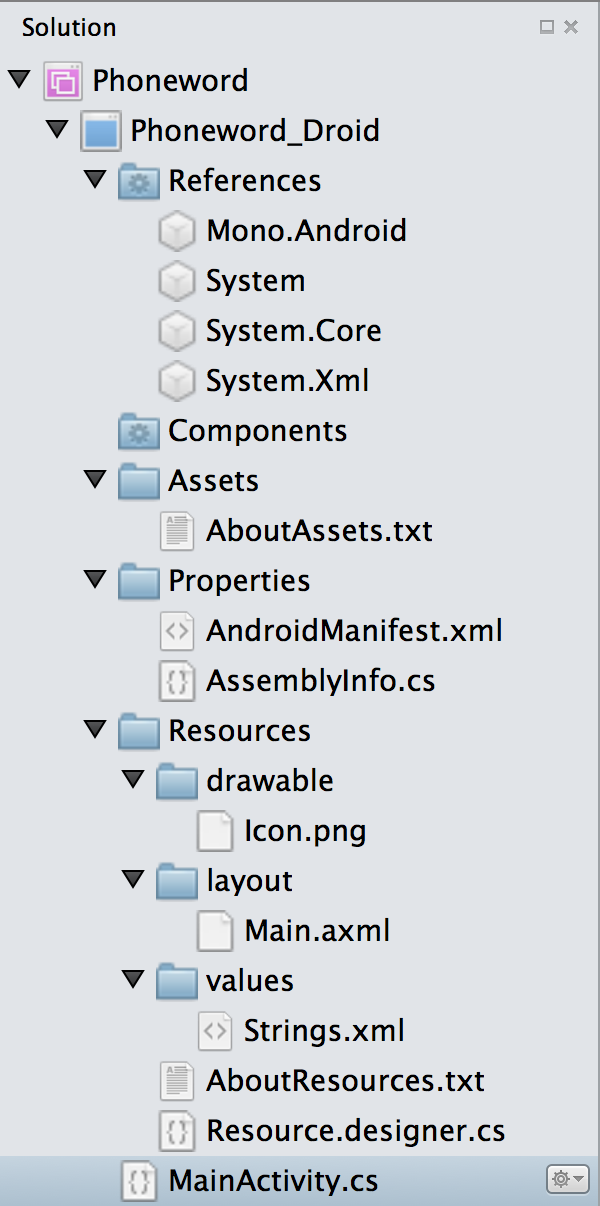
Xamarin Studio follows the Visual Studio practice of organizing code into Solutions and Projects. A Solution is a container that can hold one or more Projects. A Project can be an application (such as iOS or Android), a supporting library, a test application, and more. In our Phoneword app, we added a new Android Project using the Android Application template to the Phoneword Solution we created in the Hello, Android guide. Our Solution looked like this:

# Anatomy of a Xamarin.Android Application

Let’s get oriented with our Solution’s contents. On the left is the Solution Pad, which contains the directory structure and all the files associated with our Solution:

We’ve created a Solution called Phoneword and placed our Android project – Phoneword_Droid – inside it. Let’s take a look at the items inside the Project:
FolderPurpose
References Contains the assemblies required to build and run the application. If we expand the References directory, we'll see references to .NET assemblies such as System, System.Core, and System.Xml, as well as a reference to Xamarin's Mono.Android assembly.
Components The Components directory houses ready-made features from the Xamarin Components store, a public marketplace for Xamarin code. For more information on Xamarin Components, refer to the Xamarin Components walkthrough.
Assets Contains the files the application needs to run including fonts, local data files, and text files. Files included here are accessible through the generated Assets class. For more information on Android Assets, see the Xamarin Using Android Assets guide.
Properties Contains the AndroidManifest.xml file that describes all the requirements for our Xamarin.Android application, including name, version number, and permissions. The Properties folder also houses AssemblyInfo.cs, a .NET assembly metadata file. It is good practice to fill this file with some basic information about your application.
Resources Contains application resources such as strings, images, and layouts. We can access these resources in code through the generated Resource class. The Android Resources guide provides more details about the Resources directory. The application template also includes a concise guide to Resources in the AboutResources.txt file.
## Resources The Resources directory contains three folders named drawable, layout, and values, as well as a file named *Resource.designer.cs*. The items are summarized in the table below:
Item Purpose
drawable The drawable directory houses drawable resources such as images and bitmaps. In the default template, the drawable directory houses the application icon file, Icon.png.
layout The layout directory contains Android designer files (.axml) that define the user interface for each screen or Activity. The template creates a default layout called Main.axml.
values This directory houses XML files that store simple values such as strings, integers, and colors. The template creates a file to store string values called Strings.xml.
Resource.designer.cs Also known as the Resource class, this file is a partial class that holds the unique IDs assigned to each resource. It is automatically created by the Xamarin.Android tools and is regenerated as necessary. This file should not be manually edited, as Xamarin.Android will overwrite any manual changes.
# App Fundamentals and Architecture Basics Android applications don’t have a single entry point - there’s no single line of code in the application that the operating system calls to start the application. Instead, an application starts when Android creates one of its classes, during which Android loads the entire application’s process into memory. This unique feature of Android can be extremely useful when designing complicated applications or interacting with the Android operating system. However, these options also make Android complex when dealing with a basic scenario like our Phoneword application. For this reason, we’re going to split our exploration of Android architecture in two. In this guide, we’ll dissect an application that uses the most common entry point for an Android app - the first screen. In the [Hello, Android Multiscreen](http://developer.xamarin.com/guides/android/getting_started/hello,android_multiscreen) guide, we’ll dive into the full complexities of Android architecture as we discuss different ways to launch an application. ## Phoneword Scenario - Starting with an Activity When we open our Phoneword application for the first time in an emulator or on a device, the operating system creates the first *Activity*. An Activity is a special Android class that corresponds to a single application screen, and is responsible for drawing and powering the user interface. When Android creates an application’s first Activity, it loads the entire application: [ ![](Images/image40-1.png)](Images/image40-1.png) Since there is no linear progression through an Android application – we can launch the application from several points - Android has a unique way of keeping track of what classes and files make up an application. In our Phoneword example, all the parts that make up our application are registered with a special XML file called the Android Manifest. The role of the Android Manifest is to keep track of an application’s contents, properties, and permissions and disclose them to the Android operating system. We can think of our Phoneword application as a single Activity (screen) and a collection of resource and helper files tied together by the Android Manifest file, as illustrated by the diagram below: [ ![](Images/image41.png)](Images/image41.png) In the next few sections, we’ll explore the relationships between the various parts of the Phoneword application to gain a better understanding of the diagram above. We’ll begin with the user interface as we discuss the Android designer and layout files. # User Interface `Main.axml` is the user interface layout file for the first screen in our application. The .axml indicates that this is an Android designer file (AXML stands for *Android XML*). The name *Main* is arbitrary from Android’s point of view - we could have easily named the layout file something else. When we open Main.axml in our IDE, it brings up the visual editor for Android layout files called the *Android designer*: [ ![](Images/image028_.png)](Images/image028_.png) In our Phoneword app, we set the TranslateButton’s ID to `@+id/TranslateButton`: When we set the ID property of the TranslateButton, the Android designer maps the TranslateButton control to the `Resource` class and assigns it a *resource ID* of `TranslateButton`. This mapping of visual control to class makes it possible for us to locate and use the TranslateButton and other controls in our code. We’ll cover this in more detail when we break apart the code that powers our controls. All you need to know for now is that the code representation of a control is linked to the visual representation of the control in the designer via the Id property. ## Source View Everything we define on the design surface gets translated into XML for Xamarin.Android to use. The Android designer provides a source view that contains the XML it generated from the visual designer. We can view the XML by switching to the Source panel in the lower left of the designer view, as illustrated by the screenshot below: The XML source code should contain our Text (Large), Plain Text, and two Button elements. For a more in-depth tour of the Android designer, refer to the Xamarin Android [Designer Overview](http://developer.xamarin.com/guides/android/user_interface/designer_overview/) guide. We’ve covered the tools and concepts behind the visual part of our user interface. Next, let’s jump into the code that powers our user interface as we explore Activities and the Activity Lifecycle. # Activities and the Activity Lifecycle The Activity class contains the code that powers the user interface. The Activity is responsible for responding to user interaction and creating a dynamic user experience. In this section we introduce the Activity class, discuss the Activity Lifecycle, and dissect the code that powers the user interface in our Phoneword application. ## Activity Class Our Phoneword application has only one screen (Activity). The class that powers the screen is called `MainActivity` and lives in the MainActivity.cs file. The name `MainActivity` has no special significance in Android - although it’s convention to name the first Activity in an application " `MainActivity`", Android wouldn’t care if we named it something else. If we open the MainActivity.cs file, we see that our `MainActivity` class is a *subclass* of the `Activity` class, and that the Activity is adorned with the [ActivityAttribute](http://androidapi.xamarin.com/index.aspx?link=T%3aAndroid.App.ActivityAttribute): ``` [Activity(Label = "Phoneword", MainLauncher = true, Icon = "@drawable/icon")] public class MainActivity : Activity { ... } ``` The Activity Attribute registers the Activity with the Android Manifest, letting Android know that this class is part of the Phoneword application managed by this Manifest. The `Label` property sets the text to display at the top of the screen, and the `Icon` sets the image to display next to the text, as illustrated by the screenshot below: [ ![](Images/image44.png)](Images/image44.png) The `MainLauncher` property tells Android to display this Activity when the application starts up. This property becomes important as we add more Activities (screens) to our application in the [Hello, Android Multiscreen](http://developer.xamarin.com/guides/android/getting_started/hello,android_multiscreen) guide. Now that we understand the basics of the `MainActivity`, let’s dive deeper into the Activity code by introducing the Activity lifecycle. ## Activity Lifecycle In Android, Activities go through different stages of a *lifecycle* depending on their interactions with the user. Activities can be created, started and paused, resumed and destroyed, and so on. The Activity class contains methods that the system calls at certain points in the screen's lifecycle. The following diagram illustrates a typical life of an Activity, and some of the corresponding lifecycle methods: [ ![](Images/image45.png)](Images/image45.png) By overriding Activity lifecycle methods, we can control how the Activity loads, how it reacts to the user, and even what happens after it disappears from the device screen. For example, we can override the lifecycle methods in the diagram above to perform some important tasks: - **OnCreate** – Create views, initialize variables, and do other prep work before the user sees the Activity. This method is called only once when the Activity is loaded into memory. - **OnResume** – Perform any tasks that need to happen every time the Activity returns to the device screen. - **OnPause** – Perform any tasks that need to happen every time the Activity leaves the device screen. When we add custom code to a lifecycle method in the Activity, we *override* that lifecycle method’s *base implementation*. We tap into the existing lifecycle method, which has some code already attached to it, and we extend it with our own code. We call the base implementation from inside our method to make sure the original code runs before our new code. We’ll see an example of this in the next section. The Activity Lifecycle is an important and complex part of Android, and we’re not going to dive into the details just yet. If you’d like to learn more about Activities after you finish the Getting Started series, we recommend reading the [Activity Lifecycle](http://developer.xamarin.com/guides/android/application_fundamentals/activity_lifecycle/) guide. For now, let’s focus on the first stage of the Activity Lifecycle, `OnCreate`. ## OnCreate Android calls the Activity’s `OnCreate` method when it creates the Activity, before the screen is presented to the user. We can override the `OnCreate` lifecycle method to create views and prepare our Activity to meet the user: ``` protected override void OnCreate (Bundle bundle) { base.OnCreate (bundle); // Set our view from the "main" layout resource SetContentView (Resource.Layout.Main); // Additional setup code will go here } ``` In our Phoneword app, the first thing we do in `OnCreate` is load the user interface we created in the Android designer. To load the UI, we call `SetContentView` and pass it the *resource layout name* for the layout file - our `Main.axml`. Our layout is located at `Resource.Layout.Main`: ``` SetContentView (Resource.Layout.Main); ``` When the `MainActivity` starts up, it will create a view based on the contents of the `Main.axml` file. Note that we’ve matched our layout name with our Activity name - *Main*.axml is the layout for *Main*Activity. This isn’t required from Android’s point of view, but as we begin to add more screens to the application, we’ll find this naming convention makes it easy for us to match the code file to the layout file. Once the layout file is set, we can start looking up our controls. To look up a control, we call `FindViewById` and pass in the resource ID of the control: ``` EditText phoneNumberText = FindViewById(Resource.Id.PhoneNumberText); Button translateButton = FindViewById