
 James Montemagno
73a50381b8
Add couchbase lab.
James Montemagno
73a50381b8
Add couchbase lab.
|
10 年之前 | |
|---|---|---|
| .. | ||
| images | 10 年之前 | |
| src | 10 年之前 | |
| LICENSE | 10 年之前 | |
| README.md | 10 年之前 | |
| README_jp.md | 10 年之前 | |
README.md
Kitchen Sync
Goal
Build your first Couchbase Mobile app in just a few minutes! Take an existing Xamarin application and add data persistence along with offline support!

Understanding the Architecture
The architecture and project structure of the KitchenSync application is shown in the following diagram:
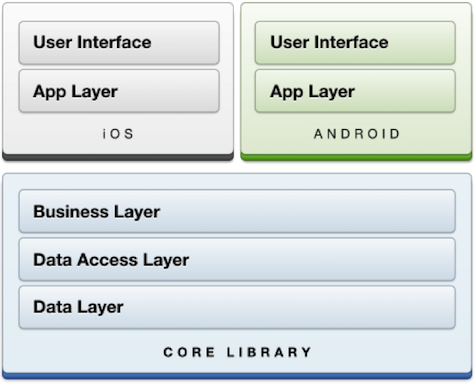
- User Interface - The screens, controls and data presentation code. In Xamarin.iOS these classes are wrappers around the iOS CocoaTouch frameworks. The user interface that you build looks, feels and performs like a native Objective-C application.
- App Layer - Custom classes to bind the business layer to the user interface, typically requiring platform specific features.
- Business Layer - Business object classes and business logic.
- Data Access Layer - Abstraction layer between the business logic and the data layer.
- Data Layer - Low-level data persistence and retrieval; the KitchenSync sample uses Couchbase Lite.
Tutorial
The tutorial will create the shared logic, as well as the iOS and Android specific portions. Each step has a corresponding comment in the workshop_start project (For per-platform items they are labeled as [step-number]A (for Android) and [step-number]B (for iOS) Otherwise, items are for shared logic) To begin, git clone the repository and load the 'KitchenSync.sln' file found from 'mini_hack_projects ▸ mini-hacks ▸ kitchen-sync ▸ xamarin ▸ project ▸ src ▸ workshop_start' path.
From within Xamarin Studio:
(1) We need to get a reference to our database object. To do that, add the below to the
TaskManagerconstructor in the 'TaskManager.cs' file:_db = Manager.SharedInstance.GetDatabase("kitchen-sync");(2) Next, we create an index to allow for fast queries. Couchbase Lite uses MapReduce queries, which let us create our queries using plain-old C# functions. We can also do powerful transformations of documents, compute aggregates, etc. In this project, however, we're going to keep things simple and just index our documents by date.
View view = _db.GetView("viewItemsByDate");
view.SetMap((doc, emit) => {
if(doc.ContainsKey("created_at") && doc["created_at"] is DateTime) {
    emit(doc["created_at"], null);
}
}, "1");
(3) Next, we start our
LiveQuery. Like a regularQuery, LiveQuery gives us the ability to filter and order the index we created in step 2. However, 'LiveQuery' also can send us results that appear later--even after we have already iterated through the results! We also need to make sure that the UI layer is informed of this, and gets a callback with already instantiated Task objects. Let's add the following:_query = view.CreateQuery().ToLiveQuery(); _query.Descending = true; _query.Changed += (sender, e) => { if(TasksUpdated != null) { var tasks = from row in e.Rows select Task.FromDictionary(row.Document.Properties); TasksUpdated(this, tasks.ToList()); } }; _query.Start();(4) We need a way to save Tasks as they are added or updated from the UI layer. While the logic is similar in both, for new documents the
PutPropertiesmethod needs to be called and for updating the Tasks, theUpdatemethod needs to be called. NewTaskobjects will not have theirIDproperty set initially, so we can distinguish between the two cases by using that fact. Add the following as the body of theSaveTaskmethod.if (item.ID == null) { Document doc = _db.CreateDocument (); doc.PutProperties (item.ToDictionary ()); item.ID = doc.Id; } else { Document doc = _db.GetDocument (item.ID); doc.Update (newRevision => { newRevision.SetUserProperties(item.ToDictionary()); return true; }); }(5) On the other hand, we also need a way to delete documents. This is simple; get an existing document and if it is not
nullthen call itsDeletemethod. Add the following as the body of theDeleteTaskmethod.var doc = _db.GetExistingDocument (task.ID); if(doc != null) { doc.Delete(); }(6A) Getting the data is great, but we need to inform the UI about how to use it. On Android, this involves setting the
Adapterproperty on theListViewthat displays the data. TheKitchenSyncListAdapterclass is responsible for this. It is already set up, you just need to create it. Add the following as the body of theInitItemListAdaptermethod inMainActivity:_listAdapter = new KitchenSyncListAdapter(ApplicationContext, Resource.Layout.list_item, Resource.Id.label, new List<Task>()); _itemListView.Adapter = _listAdapter;(6B) The process on iOS is similar, just replace
KitchenSyncListAdapterwithDataSourcein the above explanation. TheDataSourceclass is located inHomeScreenControllerand only needs a small modification to get it working (it needs to reload the table view . Add this to its constructor:taskMgr.TasksUpdated += (sender, e) => { _rows = e; controller.tableView.ReloadData(); };(7A) We want to provide a way for users to toggle the checkbox on an item. The most natural way to do this is to do it when the user taps on a row in the
ListView. Add the following as the body of theOnItemClickmethod:Task task = _listAdapter.GetItem(position); task.Checked = !task.Checked; _taskMgr.SaveTask(task);(7B) We will use tapping in iOS as well to signal checkbox toggling. Add the following to the
RowSelectedmethod ofTableViewDelegate:var task = _source.Tasks[indexPath.Row]; task.Checked = !task.Checked; var manager = new TaskManager(); manager.SaveTask(task);(8A) As for deletion, long pressing feels the most natural to Android users and so we will implement the following in the
OnItemLongClickmethod:Task task = _listAdapter.GetItem(position); AlertDialog.Builder builder = new AlertDialog.Builder(this); AlertDialog alert = builder.SetTitle("Delete Item?"). SetMessage("Are you sure you want to delete \"" + task.Text + "\"?"). SetPositiveButton("Yes", (sender, e) => _taskMgr.DeleteTask(task)). SetNegativeButton("No", (sender, e) => {}).Create(); alert.Show();(8B) However, on iOS users are used to swiping for the option to delete a row in a table view. Add the following to the
CommitEditingStylemethod ofDataSource:if (editingStyle == UITableViewCellEditingStyle.Delete) { taskMgr.DeleteTask (_rows[indexPath.Row]); }Your app now has a database and local persistence! It is a great time to build and run the application on device or emulator. You should see all of your new list items saved locally.
(9A) Let's add sync! First, we need to provide a URL for our Couchbase Sync Gateway. If you are doing this tutorial on a Mac and deploying to a real device, then enter the IP address of your Wifi interface (i.e. don't use localhost). If you are deploying to an emulator, you will need to use
10.0.2.2if you want to use localhost. Add the following member toMainActivity:private const string SYNC_URL = "http://<YOUR_WIFI_OR_ETHERNET_IP>:4984/kitchen-sync";(9B) Let's add sync! First, we need to provide a URL for our Couchbase Sync Gateway. If you are doing this tutorial on a Mac and deploying to a real device, then enter the IP address of your Wifi interface (i.e. don't use localhost). If you are deploying to the simulator, you can use localhost. Add the following Member to
HomeScreenController:private const string SYNC_URL = "http://<YOUR_WIFI_OR_ETHERNET_IP>:4984/kitchen-sync";(10) That's the hardest part! Now we need to add our
StartSyncmethod which, in this case, will continuously sync all local and remote changes. Add the StartSync logic to the 'TaskManager.cs' file located under 'KitchenSyncShared'Uri uri; try { uri = new Uri(syncUrl); } catch(UriFormatException) { Log.E("TaskManager", "Invalid URL {0}", syncUrl); return; } if(_pull == null) { _pull = _db.CreatePullReplication(uri); _pull.Continuous = true; _pull.Start(); } if(_push == null) { _push = _db.CreatePushReplication(uri); _push.Continuous = true; _push.Start(); }(11A) All that's left is to call this method at the appropriate time. Add the following to the
OnCreatemethod ofMainActivity:_taskMgr.StartSync(SYNC_URL);(11B) And add the it to the
ViewDidLoadmethod ofHomeScreenControlleras well:_taskMgr.StartSync(SYNC_URL);Build and run time! Shortly after launching, you should see lots of sync activity scrolling by in the console for your device. Make sure that you have some list items for Couchbase Lite to sync.
Let's go see the results of sync in the Sync Gateway Admin Console. Open your browser to http://localhost:4985/_admin/, and click on the kitchen-sync link. You will land on the Documents page, which will list all documents found. Clicking on a document id will reveal the contents of the document.